
OpenClaw
Configure OpenClaw to use OpenModel as an API provider via CC-Switch
Overview
OpenClaw is a personal AI assistant that runs in your terminal. It supports multiple AI adapters (Anthropic, OpenAI, etc.), social media integrations (Telegram, Discord, etc.), extensible skills, and lifecycle hooks -- giving you a flexible, programmable AI companion right from the command line.
By routing OpenClaw's API calls through OpenModel, you get access to all models available on the platform -- Claude, GPT, Gemini, DeepSeek, and more -- using a single OpenModel API key. This tutorial walks you through installing OpenClaw from scratch and then configuring CC-Switch to point OpenClaw at OpenModel.
Prerequisites
Before you begin, make sure you have:
- An OpenModel API key -- Create one in the OpenModel Console. See Authentication for detailed instructions.
- CC-Switch installed -- You will use CC-Switch to configure OpenClaw's API provider. Follow the CC-Switch Setup guide if you haven't installed it yet.
- Node.js or a compatible runtime -- OpenClaw requires a JavaScript runtime. Make sure Node.js (v18+) is installed on your system.
- A terminal -- PowerShell, Command Prompt, Windows Terminal, or any Unix shell.
Install OpenClaw
OpenClaw provides an interactive installation wizard that walks you through the entire setup process. This section covers each step in detail.
Start the Installer
Go to the OpenClaw quickstart page and copy the installation command for your platform. Run it in your terminal.
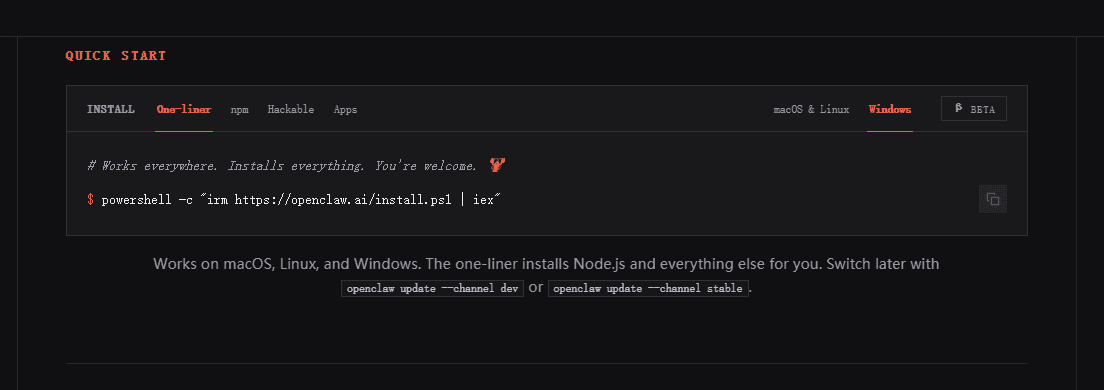
The installer will download the necessary files and launch the interactive setup wizard.
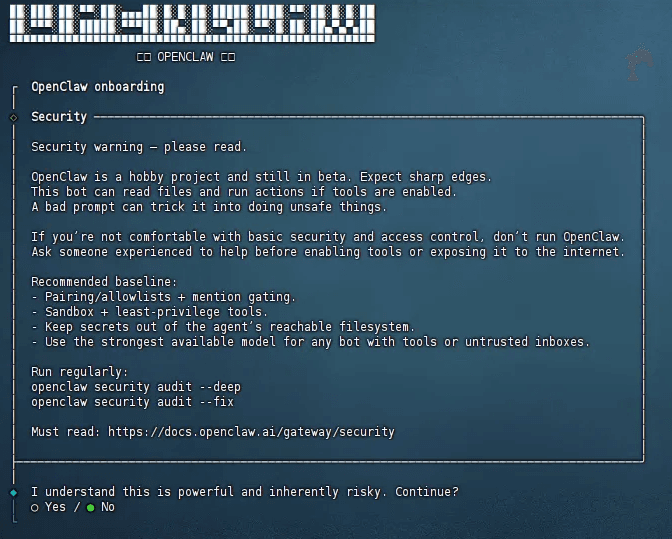
Confirm Installation
When the installer prompts you to proceed, select "yes" and press Enter to continue.
Choose Setup Mode
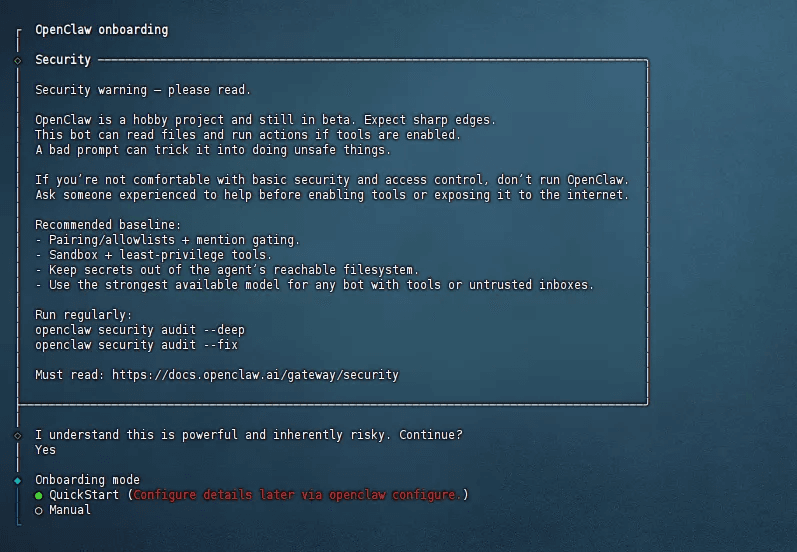
The wizard offers multiple setup modes. Select "QuickStart" and press Enter. This mode walks you through the essential configuration options without overwhelming you with advanced settings. You can always change these settings later.
Skip Provider Selection
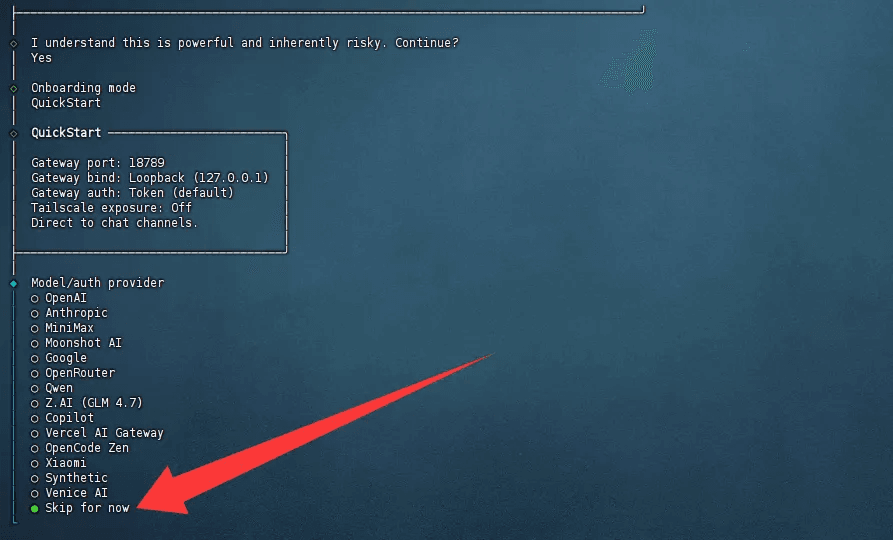
When asked to select an AI provider, choose "Skip for now" and press Enter.
Note
You will configure the API provider later through CC-Switch, so you can skip this step. CC-Switch gives you a visual interface to manage and switch providers easily, which is the recommended approach when using OpenModel.
Select the Adapter
The wizard asks which AI adapter OpenClaw should use. An adapter determines which API protocol OpenClaw uses to communicate with the AI provider. Select "anthropic" and press Enter.
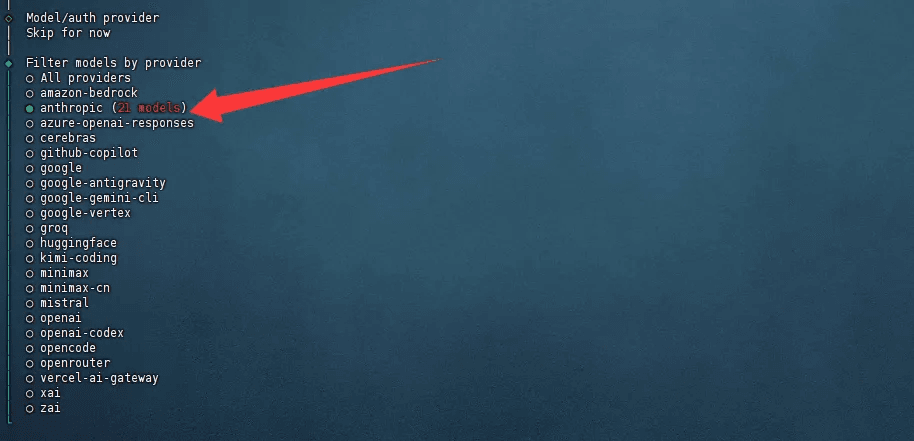
What is an adapter?
Adapters define how OpenClaw formats API requests and interprets responses. The "anthropic" adapter uses the Anthropic Messages API protocol (/v1/messages), which is the most versatile option on OpenModel -- it supports Claude, DeepSeek, DashScope, Xiaomi, Kimi, MiniMax, Zai, and more. See Available Models for the full list of models accessible through this protocol.
Choose the Default Model
Select a default model for OpenClaw to use. Choose "opus-4.5" (or any other model you prefer) and press Enter.
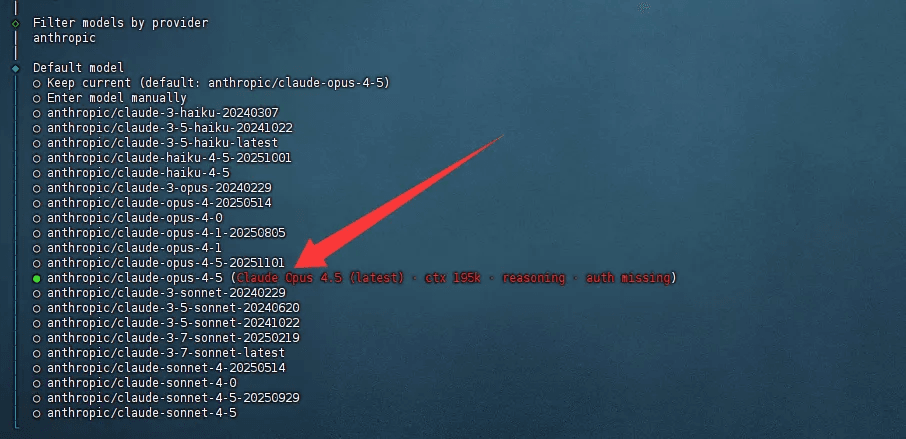
Tip
This is just the default model. You can change it at any time after installation, and you can also override it per-session. If the model you want is not listed, just pick any option -- you will configure the actual model through CC-Switch later.
Configure Social Adapter (Optional)
OpenClaw can integrate with social platforms like Telegram, allowing you to interact with your AI assistant through messaging apps. If you want this feature, select "Telegram" and press Enter. Otherwise, skip this step.
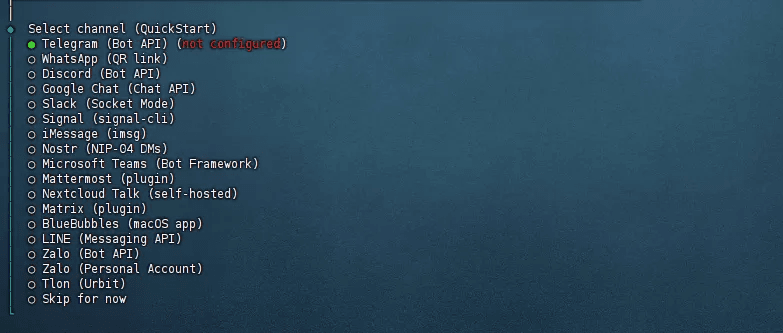
What is a social adapter?
Social adapters let OpenClaw connect to messaging platforms. When configured, you can chat with your OpenClaw instance through Telegram (or other supported platforms) instead of -- or in addition to -- the terminal. This is entirely optional and can be configured later.
Enter Bot Token (Telegram Only)
If you selected Telegram in the previous step, the wizard will ask for your Bot Token. This is the token you receive from Telegram's @BotFather when creating a new bot. Paste your token and press Enter.
If you skipped the social adapter step, you will not see this prompt.
Skip Skills Installation
When asked about installing Skills, choose to skip for now and press Enter.
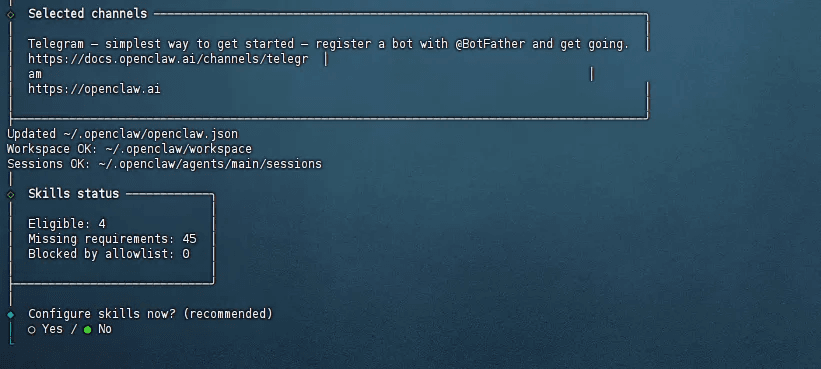
What are Skills?
Skills are modular extensions that add capabilities to OpenClaw, such as web search, file manipulation, code execution, and more. You can install skills later as needed. Skipping them now keeps the initial setup simple and fast.
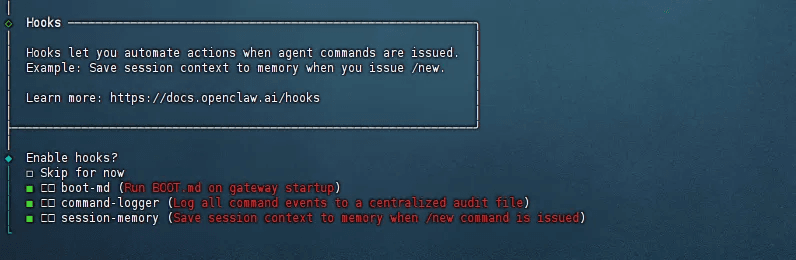
Select All Hooks
For Hooks configuration, press Spacebar to select all available hooks, then press Enter to confirm. The installer will then proceed to install the Gateway component -- wait for this to complete.
What are Hooks?
Hooks are lifecycle event handlers that run at specific points during OpenClaw's operation (e.g., before a message is sent, after a response is received, on startup, on shutdown). Selecting all hooks ensures OpenClaw has full functionality. The Gateway is a core component that manages communication between OpenClaw and the AI provider.
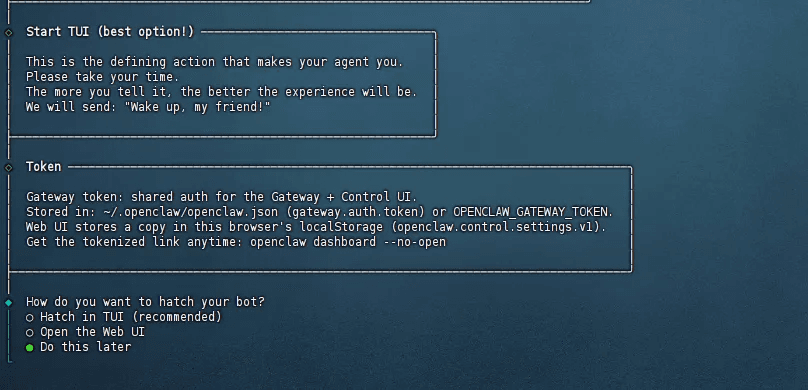
Skip Launch Method
When asked about the launch method, choose to skip for now and press Enter.
Tip
The launch method determines how OpenClaw starts (e.g., automatically on system startup, as a background service, etc.). You can configure this later based on your workflow preferences.
Install Shell Completion
When prompted to install shell completion, select "yes" and press Enter. This enables tab-completion for OpenClaw commands in your terminal, making it faster and easier to use.
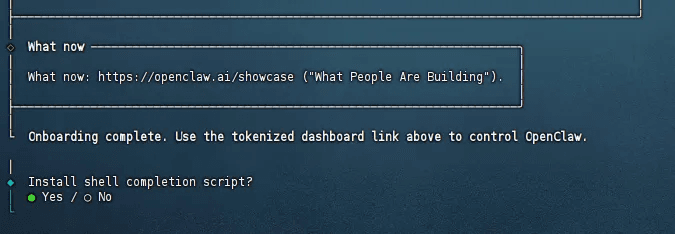
After this step, the OpenClaw installation is complete. Do not launch OpenClaw yet -- you first need to configure the API provider through CC-Switch.
Configure CC-Switch for OpenClaw
Now that OpenClaw is installed, you need to configure CC-Switch to route OpenClaw's API calls through OpenModel. This gives you a visual way to manage API keys and switch between providers without editing configuration files manually.
Prerequisite
Make sure CC-Switch is installed and running. If you haven't set it up yet, follow the CC-Switch Setup guide first.
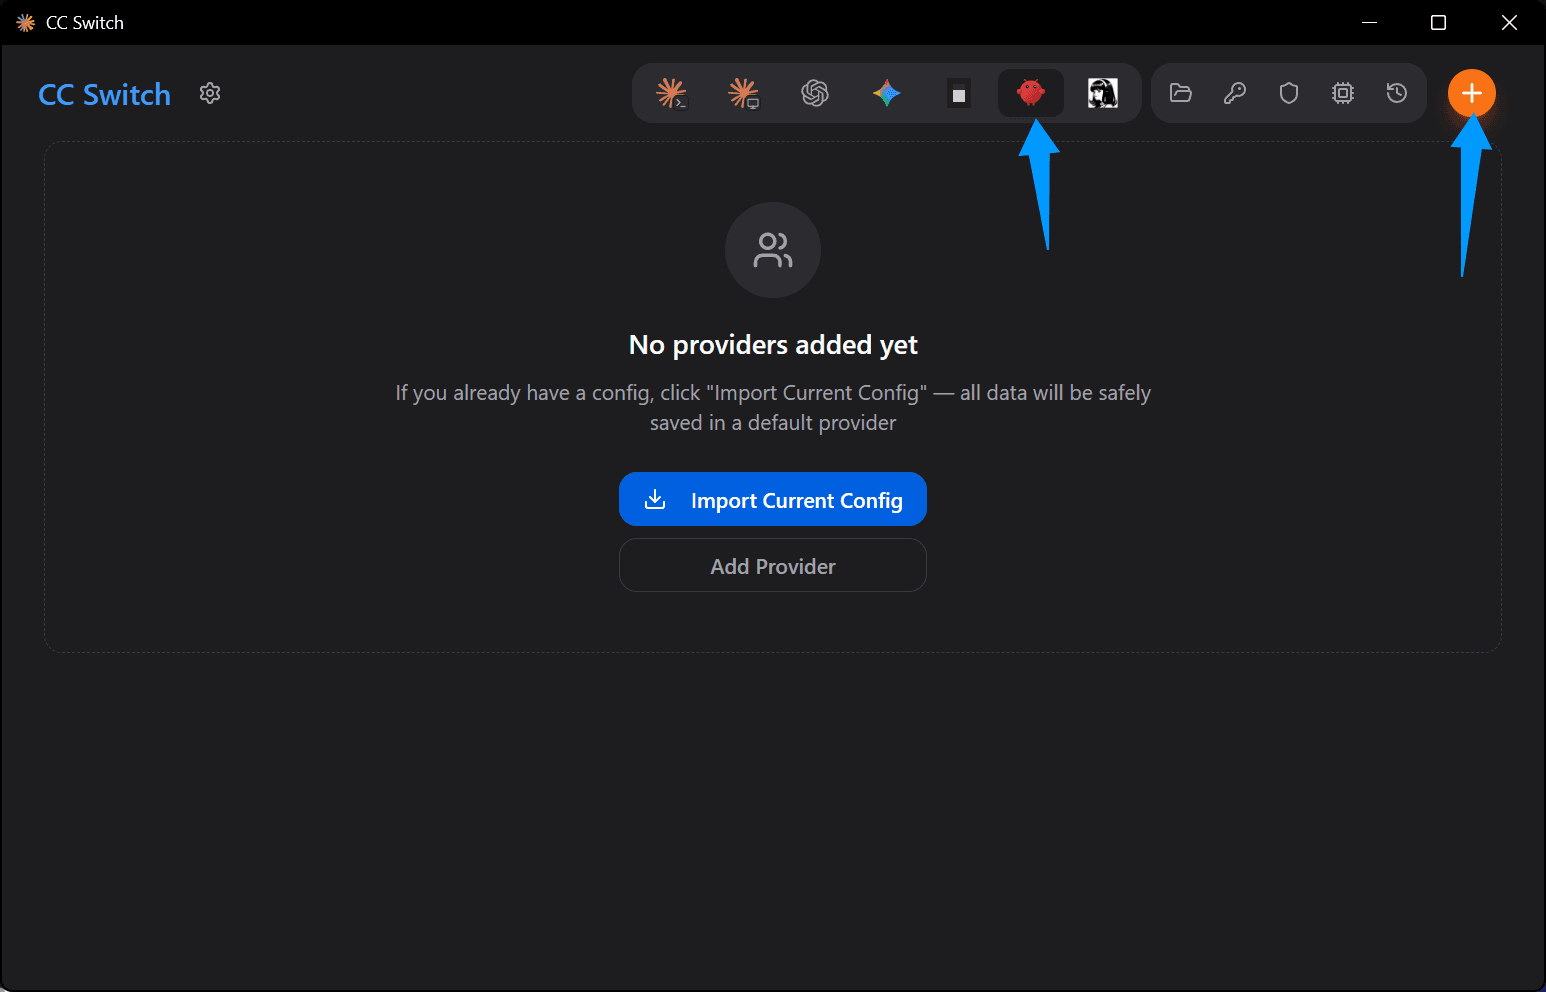
Open the OpenClaw Tab in CC-Switch
Launch CC-Switch and click the "OpenClaw" tab in the top navigation bar. Then click the orange "Add" button in the top-right corner to add a new provider configuration.
Configure the Provider
In the provider configuration form, fill in the following fields:
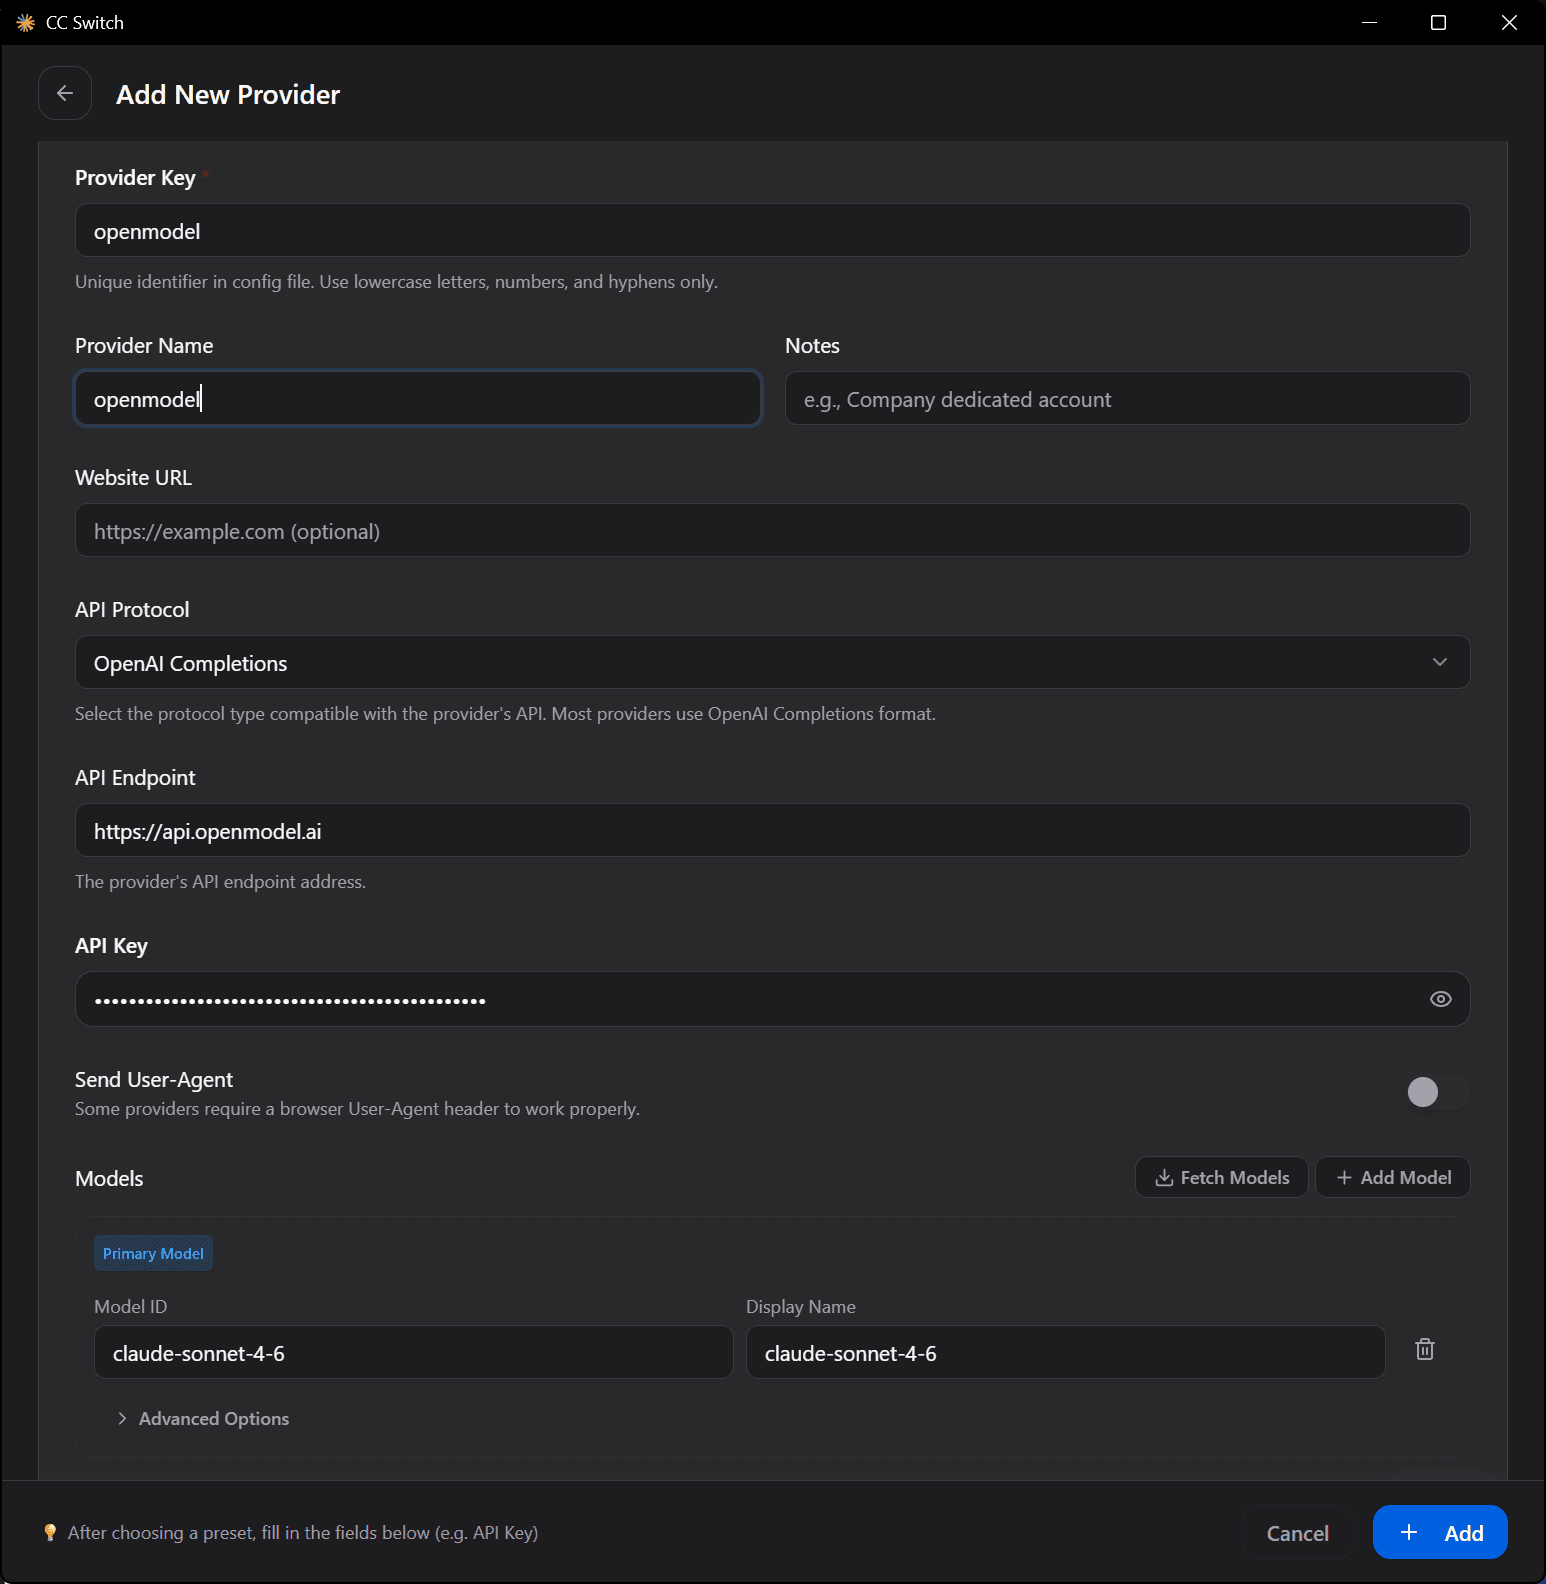
| Field | Value | Description |
|---|---|---|
| API Key | Your OpenModel API key | Paste your key (starts with om-). Create one at console.openmodel.ai if needed. |
| Models | Model names to use | Enter the model names you want available in OpenClaw (e.g., claude-sonnet-4-6, opus-4.5). You can customize this list based on the models available on OpenModel. See Available Models for all options. |
After filling in the fields, click the "Add" button to save the configuration.
Tip
The API Base URL should already be set to https://api.openmodel.ai by default. If it is not, enter it manually. Make sure there is no trailing slash.
Troubleshooting: "Invalid API Key" error
Symptom: CC-Switch or OpenClaw reports an "Invalid API Key" error.
Solution:
- Double-check that your API key starts with
om-and was copied in full without extra spaces. - Verify the key has not expired in the OpenModel Console.
- If you just created the key, wait a few seconds and try again.
Launch OpenClaw
With the installation and provider configuration complete, you can now launch OpenClaw and verify everything is working.
Start OpenClaw
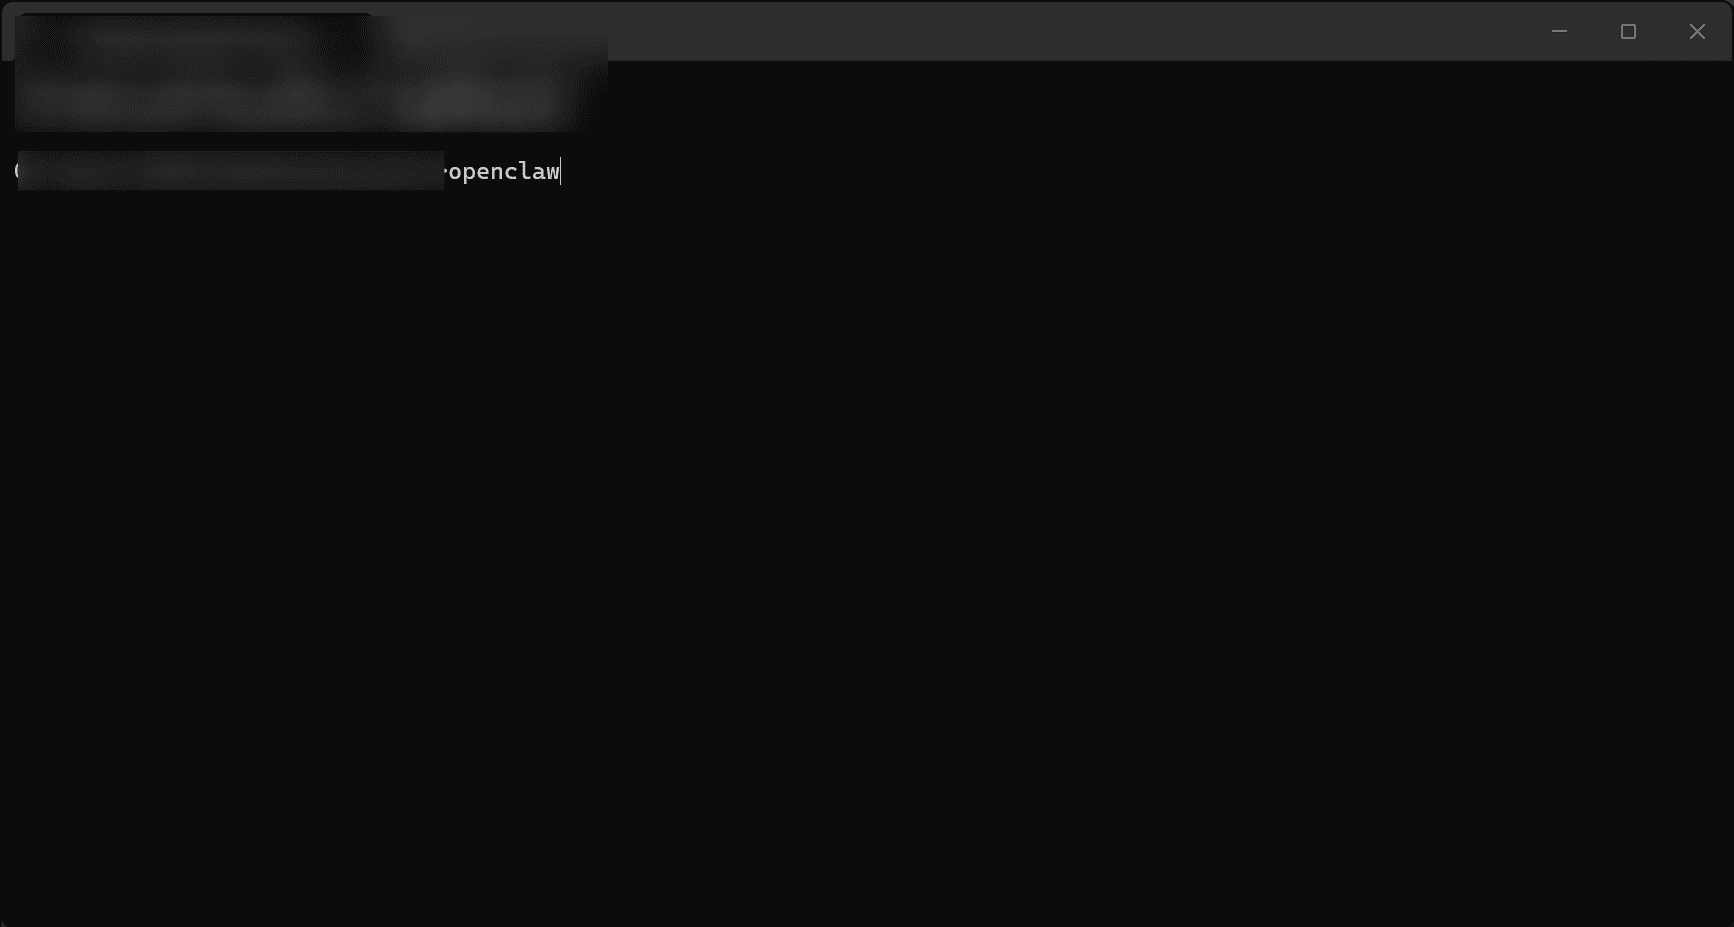
Open your terminal and type the following command:
openclawPress Enter to launch OpenClaw.
Tip
If your terminal says openclaw: command not found, try closing and reopening your terminal to reload the PATH. If it still doesn't work, you may need to add the OpenClaw installation directory to your system PATH manually, or restart your computer.
Verify the Configuration
If OpenClaw launches successfully and you see the interactive prompt, your configuration is complete. The assistant is now ready to use, powered by OpenModel.
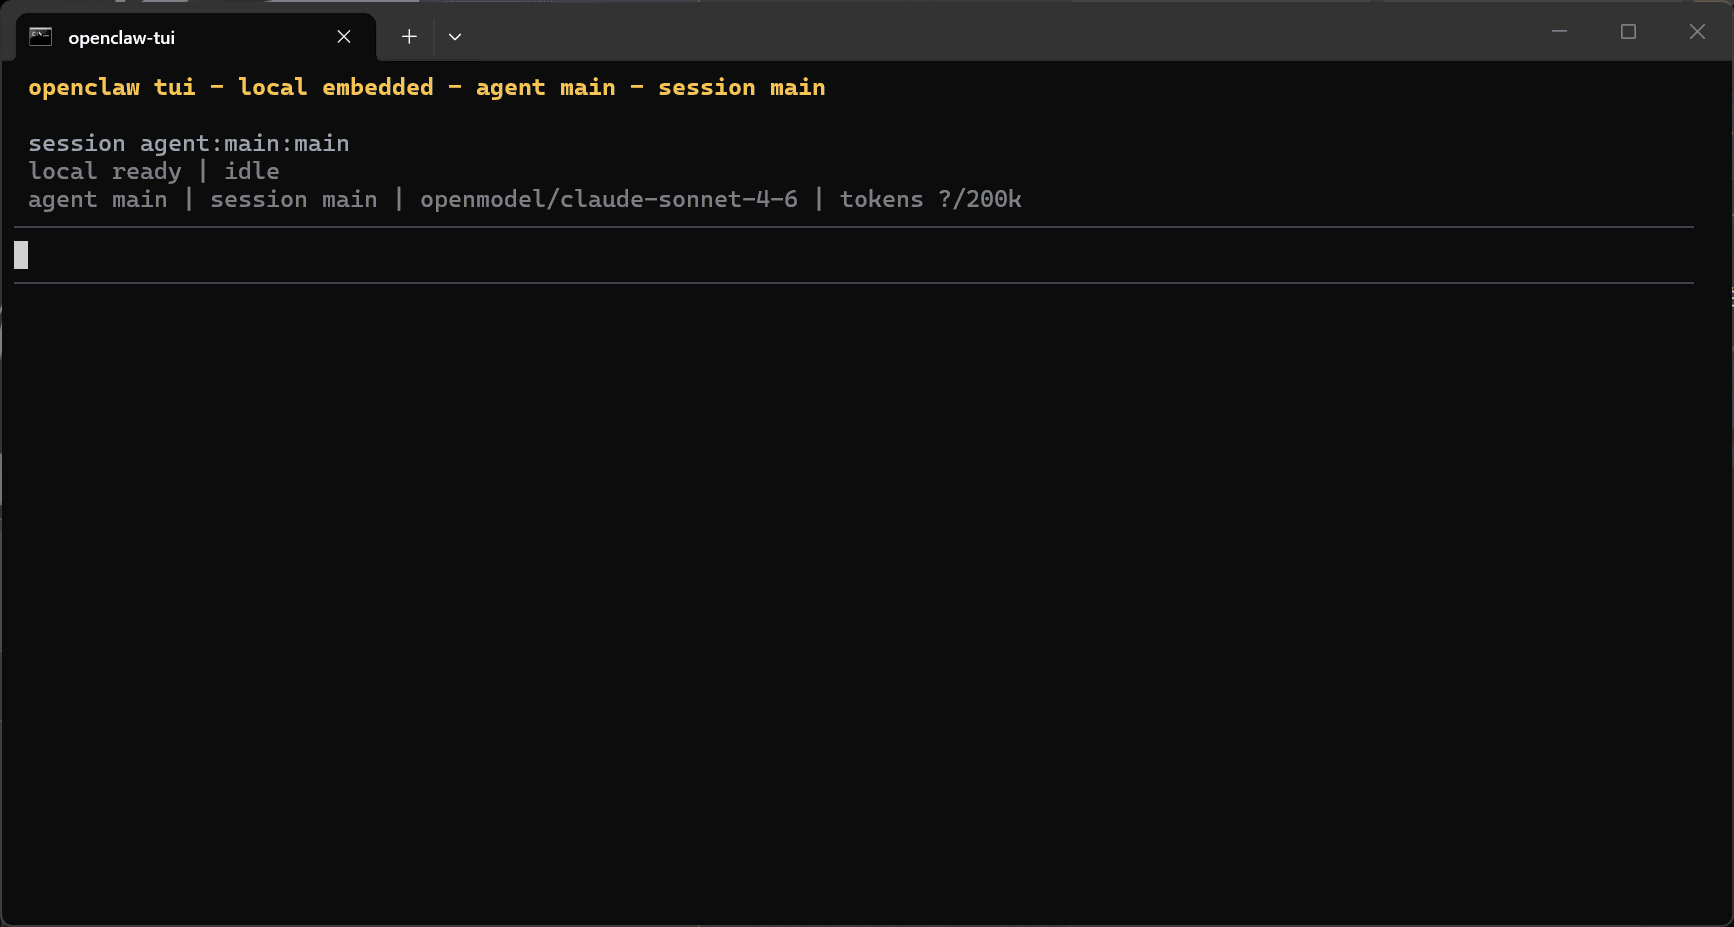
Try sending a test message like "Hello, who are you?" to confirm the AI responds correctly. If you receive a response, everything is working properly.
Troubleshooting
OpenClaw fails to start or shows a connection error
Symptom: OpenClaw does not launch, or you see a connection error when it tries to reach the API.
Solution:
- Make sure CC-Switch is running and the OpenClaw provider configuration is active (saved and selected).
- Verify your internet connection is working.
- Check that the API URL in CC-Switch is exactly
https://api.openmodel.aiwith no typos or extra characters.
"Model not found" error
Symptom: OpenClaw returns an error saying the requested model does not exist.
Solution:
- Ensure the model name in your CC-Switch configuration matches exactly as listed on the Model Pricing page. Model names are case-sensitive.
- Verify you are using the correct adapter. The "anthropic" adapter supports most models on OpenModel, but some models (like GPT) require the "openai" adapter. See Available Models for the mapping.
Authentication errors (401 Unauthorized)
Symptom: Requests fail with a 401 Unauthorized error.
Solution:
- Your API key may have expired or been deleted. Check the OpenModel Console and create a new key if needed.
- Make sure the API key in CC-Switch is correct and complete (starts with
om-).
Rate limit errors (429 Too Many Requests)
Symptom: Requests fail with a 429 Too Many Requests error.
Solution:
- You may have exceeded your account's rate limits. Check your usage in the OpenModel Console.
- Wait a moment and try again, or review Rate Limits for more details.
Shell completion not working
Symptom: Tab-completion for OpenClaw commands does not work in your terminal.
Solution:
- Close and reopen your terminal after installation.
- If you are using a non-standard shell, you may need to configure shell completion manually. Refer to the OpenClaw documentation for shell-specific instructions.
Want to switch models or providers?
- Open CC-Switch, go to the OpenClaw tab, and edit your provider configuration or add a new one.
- You can create multiple provider entries and switch between them without modifying OpenClaw's configuration files.
Next Steps
- Available Models -- Browse all supported providers and models you can use with OpenClaw
- OpenClaw Documentation -- Learn about advanced features like skills, hooks, and social integrations
- Rate Limits -- Understand usage limits and quotas
- Billing -- Monitor your API usage and spending
- CC-Switch Setup -- Manage provider configurations for other coding tools